Showing posts with label Music Video. Show all posts
Showing posts with label Music Video. Show all posts
Friday, 6 January 2012
Thursday, 5 January 2012
Editing our music video (inc. changes made from the feedback received)
Adaptions and Developments to our music video:
With the feedback we gathered and highlights from the comments, we went back to our music video and focused on particular content which was constructively commented on. Here is evidence of the changes/adaptions we have made and what effects we have used.
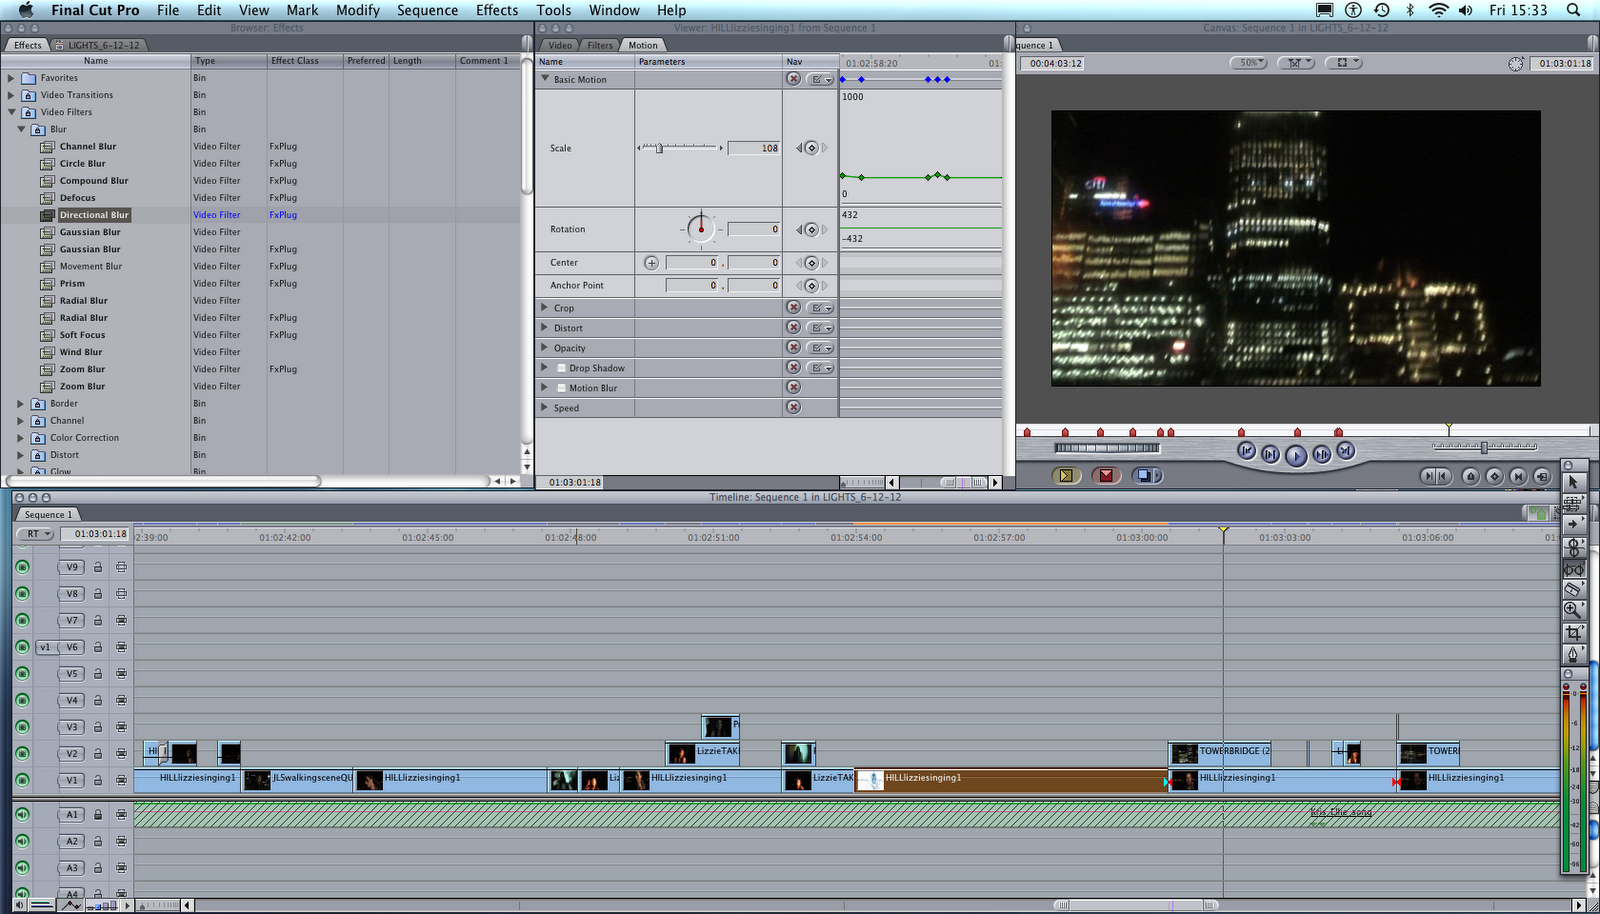
Motion/Motion Blur/Basic motion:
Through the use of Motion Blur we were able to create an exaggerate motion blur
Earthquake:
The earthquake effect gave some of our still shots some effective movement which we believed applied well to the style/sound of the song in which the shot was placed. We used it mainly for the echo/repeats of the singing so that the visuals had a relationship with the sound.

Soft Glow:
The soft glow allowed us to apply a more soft effect/glow over our shots, such as enhancing the light / bokeh movements and lightening any imperfections (e.g. uneven skin tone) on our actress/artists skin.
Brightness and Contrast:
The Brightness and contrast was used in most of our footage as alot of the footage needing adjusting to change the intensity of the light/darkness and colours in the shot.
Radial Blur:
The use of this was to have the clip create the illusion that the image was spinning. This was added to the Bokeh shots of the car lighting so that it was more defined and looked more creative.
Defocus:
Blurs an image while creating a controlled glow effect in brighter areas of the image. This results in the image structure being shaped around the highlights of the image. This shape of the glow around the highlighted area can be altered. This was used filter when we blurred one image to match video other clips used.
Echo:
This was used to create the effect that the moving area of the image was leaving a streaking tail behind it as it moved slightly. This is done by repeating frames
Soft focus:
This was used when we were overlapping clips. The Strength parameter controls how much of the blurred image is added back to the original image, while other sliders let us control the overall, horizontal, and vertical amount of blur.
Cross dissolve:
In order to blend the end of a shot with the beguinning of the following shot, we used a transition know as 'cross dissolve' which allowed us to achieve a more smooth transition of the shots.
Over Lay of clips/Opacity:
In many of our shots, we changed the opacity of the shots, with one or more ontop on other shots to allow a mixture of two or more pieces of footage to be seen. We found this particularly effective for our music video because we were able to make it look alot more interesting and allowed us to build up the creative footage ontop of the visual footage of our music artist.
In many of our shots, we changed the opacity of the shots, with one or more ontop on other shots to allow a mixture of two or more pieces of footage to be seen. We found this particularly effective for our music video because we were able to make it look alot more interesting and allowed us to build up the creative footage ontop of the visual footage of our music artist.

Heres an example with the use of opacity/overlay of two shots. One of the shots flickered in time to the beat by cutting the shots so they were introduced in time with the fast paced beat.

Speed Change:
By adjusting the speed of particular shots (mainly speeding up of the motion) we were able to apply it better to the style of song. Since the song is fairly fast paced with a quick beat, applying speed enabled us to make the footage/shots look better with the music.
Manual Scale Adjustment:
For a longer piece of footage, Lauren and I decided to apply a bit more impact with the footage by representing the sound of the beat to the quick jump/zoom into the footage. This allowed us to make this particular piece have a relationship with the song. We applied points to the footage and adjusted them ( in and out of the zoom ) in time with the music so that it looked more appealing to the viewer and keep it in context.

Beginning and end shot:
In order to keep the music video flowing, we knew we had to keep the music video consistent. One of the key things we looked at was the start and end of the music video and how we could an effective start and ending point to the music video.
We linked our opening footage of the blurred lights for the ending, as we used the same shot for the beguinning and end, however, for the end shot we used the overlay of shots of our music artist with the same blurred light shot. We did use some effects/editing features to adjust the colour, brightness and contrast of both of the pieces of footage, as with most of the footage within our music video.


Brightness and Contrast:
The Brightness and contrast was used in most of our footage as alot of the footage needing adjusting to change the intensity of the light/darkness and colours in the shot.
To many of the footage we caught which was lacking brightness and intensity, we found this particular feature useful as we were able to adjust both features to improve the quality of the film.

Image control;Effects:
Some of the effects we used within the 'Image control' folder were 'Brightness and Contrast' 'Colour Balance'


Fade in/out:
We applied this particular transition to a few selected shots where we believed it was appropriate and would allow the music video to flow well with the music itself. We incorporated many quick cuts in the video, in order to keep with the time and pace of the song, but in some places where we felt it needed to blend from one shot into another, we used the fade in/out transition.


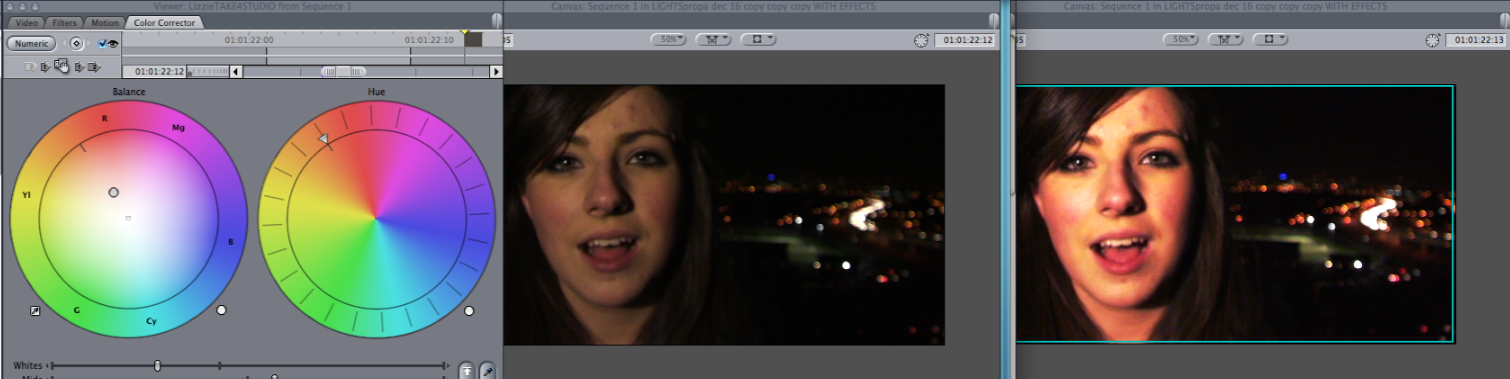
Colour Correction / Colour Balance:
We used the colour balance in shots where we believed it was either lacking in colour or the colour tone of the footage needed altering. The colour balance allowed us to use colour wheels for 'Balance' of colour and 'Hue'. When we perceived a shot to be lacking in colour or appearing a particular shade of colour which wasn't well suited, we were able to change the shot to the colour we believed to be suitable for the style of music video we were going for. Such as linking the colour of the orange/yellow shades of blurred lights with the natural shades of our 'music artists' face.

Prism:
The prism effect allowed us to apply the concept of 'Lights' into our video by giving a couple of our shots/footage an ultraviolet style. We found this effective because we were able to manage the intensity of the effect. We timed the growing strength/intensity of light as the powerful note kicks in; we were able to do this manually by adding in points and adjusting them in time.


Zoom blur:
Zoom blur allowed us to distort some of our shots to look as if speed itself has been applied to the shot, distorting how it looks and making it look out of place.


Slit Tunnel:


Bloom and Soft Focus:
Applying the bloom effect over some of the shots enabled us to create a particular glow, particularly to our blurred light effects, enhancing the light itself and making it appeare more bold.


Bad TV:
The Bad T.V. effect was applied to a couple of shots because we believed it would be a suitable application to the shot and believed it fitted in well with the 'lights' concept - coming through as if it were a T.V. producing light. We also noticed it added more flare and movement than what it was originally - which would attract our audiences attention alot more.


Creation of the Introduction Banner using Motion:
Once we decided what music channel our video would be shown on, we created a logo for this. We used Up Your Viva as our music channel therefore we used a similar logo to theres. Below is evidence of us editing our introduction banner.


As a background image, we decided use one that we had taken with our camera as it had a very cool creative effect. The other reason was that we wanted to keep the banner consistent with the colours used in our music video.

This image's opacity was turned down so that it was more discrete.

We added text to display the Artist, Song title and the Record label.

Here is the fonts list that we chose from. It was then saved as a PNG file.


Motion:

To create the Introduction Banner to be used for the music video, Motion was used. When selecting the to create the project, the project preset that had to be used was PAL DV. This was because we were only creating a small motion under 250 frames.
The PNG file was imported onto Motion to start creating the motion transitions.

Recording of the banner being moved up and down.


Recording being stopped one this is done ready to be saved.

Saving project as

Introduction Banner working

Meeting (05/01/12) and highlighting feedback
What we discussed/did:
From the feedback we had gathered throughout the half term, Lauren and I decided to go through the comments we received on our rough-drafted music video. We decided to print out the comments and highlight the positive and negative comments we had received (highlighting the most important feedback, the constructive comments/criticisms, in yellow)
From this we were able to divide the feedback and focus on what we need to work on for our music video development. We have acknowledged comments based on the lighting, contrast, colours, shots used, changing amount of blurred shots and overlaps used in the video accordingly to the comments received as-well as our own perception.
In order to keep time spent on the music video equal, we decided to break up the day evenly for each of us to spend individually (as well as together) in our lesson and free time in the day. Period 2 we concluded our comments/changes needed to be made, so that we were organised for the construction. Throughout periods 3 and 4 we worked together on the video and discussed what we thought about what shots should be changed the most. In period 3, I (Aimee) worked on parts of the video such as cutting the shots in time/beat of the song (to make it a faster pace), enhancing the shots of the projection, using brightness and contrast, blur focus and colour correction, overlaying shots onto those which looks 'messy/distracting' to the viewer so it looked more appealing, and Lauren worked in period 4 and til 5:00 after school and worked on improving the image quality (brightness/contrast), colour correction, blur, adding in creative shots..etc and changing certain shots accordingly to ensure we covered the criticisms given to us.
Lauren and I covering the feedback given to us
(highlighting/discussing)

Feedback received and highlighted:
In green pen we highlighted the positive feedback, but in the yellow pen we highlighted the constructive criticisms we received for the music video


Here is evidence of us going through the music video and feedback, writing down the points made of the criticisms of the changes to make in certain clips, referring to the green highlights/comments.

During this lesson/meeting, we also generated a draft of the pop up that would show the name, title of artist and record label (bokeh productions) at the beguinning and end of the video.


During this lesson/meeting, we also generated a draft of the pop up that would show the name, title of artist and record label (bokeh productions) at the beguinning and end of the video.

Friday, 16 December 2011
Final Rough Draft
Here is our final rough cut of the music video. We have constructed using Final Cut ever since we had captured and logged the footage from the camera. We have worked on it for the past couple of weeks and feel please with what we have achieved. We hope to gether some feedback, comments and constructive critisms, from the viewers so that we can develop more on the video and make it alot better!
Friday, 9 December 2011
NEED TO DO AND ADD: Editing the footage for the Music Video
Our aim when editing the footage, our aim was to ensure our music video was visually appealing and ensure the visual content of the footage has a relationship to our song/song title.

The footage we will be using for editing our footage is a programme known as 'Final Cut Pro' - video editing software.


Here are some of the useful editing bars: We mainly used the 'cursor, 'cut' and 'cropping' tool.


Multi-clip
Multi-Clip is useful for saving time and allowing effective timings of shot changes. From the tutorial received on how to multi-clip, we decided to use multi-clip to see how effective it would be for our own music video. We found it a great difficulty to use it because there wasn't many instrumental cues (apart from the lip-syncing) and alot of the music video consists of creative shots.
In the end, we decided not to use the multi-clip idea and manually cut and arrange the clips in time.
In the end, we decided not to use the multi-clip idea and manually cut and arrange the clips in time.

Bad TV effect
To stylise and input notions of looking, we used the effect 'bad TV' to give a tv stylised effect to a couple of shots. This enabled the shot to look more effective.


Earthquake effect

Gloom Effects

Motion blur


Change of speed
To log:
- Images of effects used / processes and WHY
- Background about the programme used
- Multiclip? and then not using multiclip / why?
12/12/11 - Aimee working on editing whilst Lauren got on with photos from the shoot
Trying to get bulk of the project underway and focus on starting up some fast paced shots...
Subscribe to:
Posts (Atom)